|
|||||||
| Register | FAQ | Members List | Calendar | Today's Posts | Search |
 |
| Thread Tools |
Rating: 
|
Display Modes |
|
#65
 02-06-09, 08:39 AM
|
||||
|
||||
|
I have been on assignment in the west for the last 12 days. Just returned home and I want to know too. I will have a report soon.
Thanks for asking
__________________
Herb R Harney 1968 337C Flying the same Skymaster for 47 years 
|
|
#66
02-07-09, 09:39 PM
|
||||
|
||||
|
Back to work in Kalamazoo
It's back to work, now that I am back. Larry took good care of 2JF while I was out West in mountain country, thanks Larry. Progress is starting to become a meaningful word. It sure seems like it has taken a while but good work takes time. Especially part-timers. But I have some good part-timers. Larry continues to provide security on the grounds. Last week he saw strange foot prints in the snow around the hanger and back yard. Ok, it's time to lock her down! Everyone has a key and the hanger is locked, thanks again Larry.
Yesterday I finished the interior windows, that was really frustrating. Trying to be satisfied with brand new windows and eliminating dust between the outer and inner was grueling. Just about the time I would think it was clean with one last wipe, boom, another streak or too much static and here comes the dust. I tried several types of cleaner, anti-stat, cloths and finally used warm water with just a titch of soap. Yes, finally something that I am satisfied with, not 100% perfect, but acceptable. I was working on installing the two middle and two rear inners. I spent a good 3 hours and then re-did the first attempt window this morning. Now I think I am ok with them. Wow, does it look nice. I am so glad I went with the grey tint. The inners are clear and the outers are grey. The windshield and pilot / co-pilot have the UV/sun control. No reason for the middle and rear because they are under the wing. It costs about 20 to 30% more for the UV control but because I don't plan to do this again for a while I thought I would do the UV control. As indicated in previous posts this feat of installing the windshield was intimidating because of all the advice that everyone offered. Even the windshield manufacturer said that those Skymasters are a bugger. Well, I decided to take the old w/s to the manufacturer, just 120 miles away in Flint, MI, and they made some adjustments to the new one based on what Cessna put in 40 years ago. I can only figure that this little gesture helped because it installed very painlessly. Side windows, not too bad. Door window, pain in the butt. Inner windows, easy but tedious because I wanted it perfect. The right wing is all back to normal after inspecting all fuel cells and finding a leaky fitting that had to be removed and welded. Fuel is back in the main cells and panels are buttoned up tight. Now the left wing is open, we removed the left auxiliary cell to gain access for a strobe cable to the rear left tail. Thanks again to Larry and Craig for their time they spent removing the tank and sump (big pain) to just satisfy my silly desire for another strobe light. But we started down that road and just couldn't stop. Left side of the brain kinda thing. Well the cable is in and now we have a problem with the fitting on the sump tank that will need repaired. All the wing panels are off on the left side right now and all looks good. Some typical staining around the gauge senders so those will receive new gaskets. I had to straighten up the cork padding strips under the aux tank. GMAS suggested that I just use the same material, it doesn't wear out. He is right, the stuff is like new just needs to be re-attached in a couple spots. Stick it down with some Pliobond (thanks GMAS) and your good to go. We will pressure (carefully) check the tank before it goes back in even though there was no indication of a problem (thanks Jim). What is interesting was finding some notes, in the wing, where the left aux and mains are. One says "Hi you all" written with a marker. Figured it was one shift leaving messages for the next shift. The photo below of the aux tank bay shows the writing. Another interesting bit of info was that on several structural pieces in the cabin and on the wing panels it is stamped M-337. Lots of parts are marked that way, I think 2JF is part O-2. Cool!
__________________
Herb R Harney 1968 337C Flying the same Skymaster for 47 years
|
|
#67
02-07-09, 10:04 PM
|
||||
|
||||
|
In a earlier post I had discussed the original radio vents on the outside of the cabin. I wanted to remove them because I had a powered avionics fan that had been installed several years ago to provide direct cooling to the avionics. Well the original vents were not even plumbed to the radios anymore and I thought why have these ugly little openings when the aircraft is going to paint. Now is the time to remove these if I can. I had one response concerning the removal and made me think a little more about going through with this. Then I decided to call a major avionics shop and asked them about the vents. They said remove them, they are nothing, just allowing moisture to migrate into areas you don't want moisture. With the powered avionics fan there is no need for these exterior vents. I did find one duct that was not attached to the fan that fed air to the engine / fuel gauge cluster. I figured it would be best to attach this to the powered fan. I had two fittings off the fan not being used so it is now attached. We made some real nice patches for the old vent areas that will be almost invisible with the new paint. Because the rivets that Cessna used for the original vents had to be dimpled, it required the patch holes to be countersunk just enough to fit flush to the inside skin. The original skin is .024 but we had to use .032 for the circle hole to fit flush to the outer skin. The circle was sanded just a little to allow a clean smooth finish. The paint shop will do the rest.
The tail cone for the new strobe needed TLC. This side of the tail has never had a light in it. The opposite side holds the clear nav light and I have had issues with it before too. Well a little Bondo and fiber will bring this back into shape to hold the new strobe light powered by the 2 day run the cable :-) Should look good at night. The center strap is back on the new windshield and along with the components that live attached to the center. My interior tech did a great job on the center strap trim. It has new life with the new paint and color. Re-install the glideslope antenna and the pilot and co-pilot vent manifold.
__________________
Herb R Harney 1968 337C Flying the same Skymaster for 47 years
|
|
#68
02-07-09, 10:14 PM
|
||||
|
||||
|
The interior is starting to take shape. It is really nice to see some progress that is really noticeable. The headliner is Ultra Suede and will be a huge improvement over the original Cessna vinyl. The new eyeball vents and lights add a touch of class and modern look to the interior. The side panels are started and this is just a first glance at what is in store for the exquisite design with the materials that were chosen. This is exciting, more to come, stay tuned.
__________________
Herb R Harney 1968 337C Flying the same Skymaster for 47 years
|
|
#69
02-08-09, 05:43 AM
|
||||
|
||||
|
Quote:
|
|
#70
02-08-09, 09:29 AM
|
||||
|
||||
|
That would make sense, because all the parts stamped M-337 are primed. Were all the Skymasters built in the Wallace Plant? Was that the only plant they were assembled?
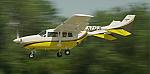
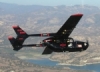
As you carefully look at this aircraft it leaves a lot to be desired in the streamline, finesse arena. In some places it looks like they had some last minute thoughts on some straps and patches here and there. It's definitely a aircraft that was built for utility and not looks or speed. It's airframe strength was tested with the military use and I like the idea of how strong the whole frame is rather than built for speed and looks like Bo's or Moo's.
__________________
Herb R Harney 1968 337C Flying the same Skymaster for 47 years
|
|
#71
02-08-09, 04:41 PM
|
||||
|
||||
|
Hi Herb, The project is looking good so far. I'm looking forward to seeing the finished product. Actually I would have liked to have seen more of the work in progress in person but I guess the photos will have to do, keep them coming please. One item I was wondering about but haven't seen you mention is the matter of corrosion proofing. It looks like, with copious amounts of solvent and elbow grease, you have large areas of internal panels gleaming clean. They look great but removing 40 years of oil & grime now leave them exposed. Are you treating them with CorrosionX or similar product before reassembly? Good luck with the remainder of the work. Best wishes, Steve G.
|
|
#72
02-08-09, 10:06 PM
|
||||
|
||||
|
There were very few places of corrosion, most of what you see has not even been wiped off. This aircraft is really clean and in good shape. Those few areas that had some noticable corrosion were cleaned and treated as indicated in earlier posts. I will be treating the aircraft with Boeshield before the paint. http://www.chiefaircraft.com/airsec/...onControl.html Boeshield was developed by Boeing. Goes on with air in a fine mist or fog. Doesn't leave a mess like some of the other products and drys to a waxy film quickly. Come on out, Larry has an extra bedroom and we will put you to work.
Here are some more photos, left wing panel, the M337 stamp in the cabin, left boom sump tank (what a pain to remove), sound control in the cabin, left aux tank.
__________________
Herb R Harney 1968 337C Flying the same Skymaster for 47 years Last edited by hharney : 02-08-09 at 10:21 PM.
|
|
#73
02-09-09, 09:39 AM
|
||||
|
||||
|
Having sprayed CorrosionX into my acft. twice now I know from experience that it is not easy to deliver product throughout the airframe. The thinking behind the question was that treating the wings and booms while the fuel tanks are out would greatly facilitate that portion of the job. Also, cabin soundproofing will preclude treating sidewalls and once your new interior is installed I suspect you might not be thrilled with the prospect of trying to spray above the headliner and elsewhere within the cabin. The good news with the fogging spray is that it goes everywhere. That's also the bad news. I'm not familiar with BoShield but with the other thin film oils their application delays painting for a year or more as the material weeps through lap joints, screw holes, etc. If you haven't yet you might want to speak with your selected paint shop as to timing. I suspect you might now be better off waiting until after painting, even with a wax based product.
|
|
#74
02-09-09, 01:18 PM
|
||||
|
||||
|
BoShield goes on as a fog, and displaces water, but when it dries, about 2 days, it leaves a waxy finish over the surface, protecting the surface from further water migration.
It's also messy on the outside, where there is overspray, but it will be stipped so it isn't much of an issue.
|
|
#75
02-12-09, 06:54 PM
|
||||
|
||||
|
Steve you are so right about the timing with the panels open. Why I didn't think of it was unknown. But because you mentioned this, the timing was still good, the left wing was still open and so I did treat it. Although we only had the aux tank out (all panels were off) I was still able to spray the Boeshield with ease around the aux and main tanks. Sometimes you just don't think about these opportunities. I have started to treat the rest of the airframe as we open other panels for an annual inspection while we are doing all this work. I figure even though the annual is not due, I have all these panels open so why not do another inspection. So I'll have a year from the finish date (real soon) for the next annual. The Boeshield is really clean and does not bleed like Corrosion X.
Well just an update on progress, the left wing is back together and buttoned up. All the insulation and soundproofing is in place. The headliner is 90% done and the new BAS seatbelt restraint system is installed. All the widows are finished, only the door and E exit have to be attached to fuselage. I started stripping the door window seal today. What a mess, someone used way too much weather strip adhesive. I call it gorilla snot. When it's dry and old it takes hours to remove. Let's see what's left, motor mounts on the rear engine, spin on oil filter adaptors, strobe lights, main gear tires, front gear hydraulic hoses, oil leak on the front engine,,,,,,,,,,,,,,,,,,,,,,,,,,,,,,,a few other exterior chores. We worked hard this week to finish anything in the cabin so that the interior upholstery could be finished this weekend. Should have 90% of the new interior in by Saturday including the Rosen visors. FINALLY!!! I talked to the paint shop today, looks like they are ready to see the airplane in about a week or so. I still have to make a decision on the paint scheme but I am on my second draft of design and hope to make a choice here real soon. I will continue to post progress as the aircraft goes through the paint shop. This has been a fun project and thanks to Larry and others on this message board, it has been a real education. I hope this thread helps others when they go through this process in the future.
__________________
Herb R Harney 1968 337C Flying the same Skymaster for 47 years
|


 Linear Mode

